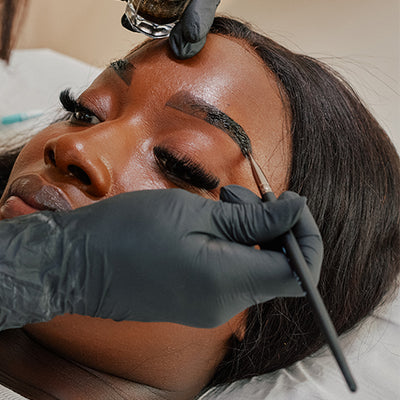


How to Use So Henna Brow Henna for Incredible Brows!
Brow trends change by the minute, it seems, so it can be difficult to know what kind of treatments to offer your clients and the type of look to specialise in. What if we told you that you can achieve three very distinct looks with Brow Henna, just by applying or removing it in slightly different ways?
Look 1: Graphic Henna Brows
Graphic brows are those super dark eyebrows which we see on the likes of Cara Delevigne and Emelia Clarke - these are more in line with brow lamination treatments, however if you have sparse brows or lighter brows, you might opt for this style to bulk them up a bit.

To achieve this look, simply carry out your pretreatment and mapping (check out this blog for brow mapping 101), mix up your brow tint and apply it to the eyebrows in one thick, even layer. Leave on for up to 20 minutes, depending on how dark a tint you’re aiming for and then remove gently with a damp cotton pad. You’ll be left with a gorgeous full looking brow set which will be the envy of every one of your instagram followers!
Look 2: Ombré Henna Brows
Like before, you’re going to map out the brows and then mix up your henna. Apply your henna dye mixture all the way along the brows, starting at the tail end and working your way to the inner edges.

When it comes to removing the Henna from the brows, you’re going to start slowly from the inner brow area to give this section less time to develop - you can even remove this section a minute or two earlier than the middle and tail end for a more obvious result!
Look 3: Natural Henna Brows
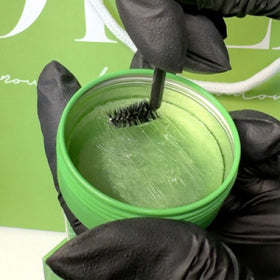
This will work best on clients who have quite thick brows already, or at least brows without gaps, as you’re not going to be getting a lot of product on the skin. To achieve this look, take a mascara style wand and dip it into your So Henna mixture. Get rid of the excess and then brush this through your brows, covering the hairs and getting very little on the skin.
You don’t have to map as thoroughly with this style as you’re not mapping out the skin, but if your client does have a gap you can use your mascara wand or a super thin brush and use it to create the illusion of hairs in the gap. Leave the brow henna mixture on for as long as you need to (up to 20 minutes) and then remove as normal, with a damp cotton pad.

However you style your brows with So Henna, you can be safe in the knowledge that there is a look, a shade and a technique for getting the perfect brows for each and every client!
All images provided by the wonderful Veronica Rich - check her out on Instagram for Brow and Lash inspiration and training!