What Are Angel Lashes? A Guide to Angel Lash Extensions


Table of Contents
How To Create The Perfect Set Of Angel Lashes
Angel lashes are lightweight, wispy eyelash extensions created using narrow closed fans and delicate spikes. They combine the definition of classic lashes with the soft texture of volume lashes, producing a natural but fuller angelic effect.
So if you’re looking to expand your lashing repertoire and would like to create your own sets of Angel lashes for your clients, then read on to find out more about what Angel lashes are and how to create the perfect set!
What Are Angel Lashes?
With many clients requesting more natural looking lashes that still give them some volume, Angel lashes are the perfect solution and are very on trend. To create a set of Angel Lashes, you’ll be using a technique similar to what you’d use when creating a set of Wet Look lashes, however the lash fans and spikes used for a set of Angel lashes will be a wispy version of that style. Angel lashes can be incorporated into pretty much any of the lash mapping styles your client desires because these lash extensions will help to enhance your client’s natural beauty, emphasise their eyes, and complement their face shape.
The lash extensions that are used to create a set of Angel lashes are more lightweight than what you would use to create a set of Classic lashes. The desired appearance for Angel lashes is softer, lighter and more wispy lash look. For those clients who would like a more bold and dramatic look for their lashes this can also be achieved by using the Angel lashes technique, however this style of lashes is more commonly known as Manga lashes. A set of Angel lashes usually requires approximately four to five lash extensions on each individual lash. They tend to last longer than a Classic lashes set, meaning they’re an excellent style of eyelash extensions for your clients who have a quicker natural growth cycle.
Angel Lashes vs Classic Lashes: What’s the Difference?
| Feature | Angel Lashes | Classic Lashes |
|---|---|---|
| Application technique | Narrow, closed lightweight fans and delicate spikes | One individual extension applied to each suitable natural lash |
| Finished appearance | Soft, wispy and textured with a light volume effect | Clean, defined and naturally enhanced |
| Volume | Light volume with visible spikes and texture | Natural definition without volume fans |
| Top line | Intentionally uneven and wispy | Typically smoother and more uniform |
| Best suited to | Clients wanting a lightweight, textured lash style | Clients wanting simple, natural-looking definition |
| Overall effect | A blend of Classic definition and soft Volume texture | An enhanced mascara-style effect |

What Eyelash Extensions Are Used For Angel Lashes?
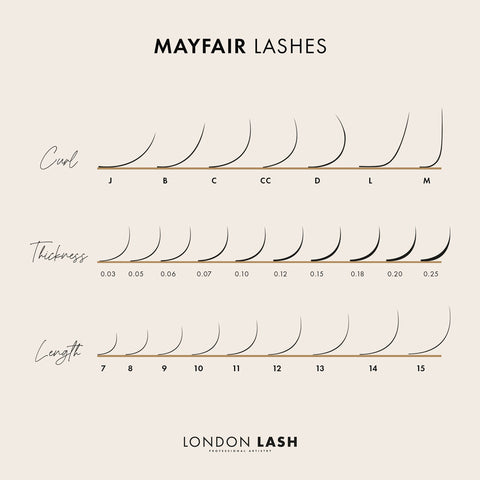
As we mentioned previously, the process for creating a set of Angel Lashes is similar to a Wet Look set of lashes, but we’re aiming for a light and natural wispy texture for the lash spikes. So the ideal eyelash extensions to achieve this are our Volume Mayfair 0.07 lashes to create gorgeous 2D fans. For your clients who may have more sparse natural eyelashes, but they’ve fallen in love with the wispy look of Angel lashes, then you can include some more open fans to fill in any gaps between the natural lashes as well as helping to further accentuate the texture from the lash spikes you’ve used. If this is the case, then we would suggest here that you can use at a maximum, our Mega Volume Mayfair 0.05 lashes to create 3D volume fans will still provide the light and wispy lash look you’re going for, whilst also helping to remedy the sparseness of your client’s natural lashes.

Who Would Suit Angel Lashes?
Similar to a set of Squirrel lashes, Angel lashes are also quite a versatile style of lash extensions. This style of lashes can cater to many clients as they create the illusion of a set of Classic lashes but with a touch of wispy Volume lashes since we will be adding more lash extensions to the natural eyelashes. Specific examples of clients we believe would definitely suit this style of lash extensions are those with round, narrow, or almond shaped eyes that are a relatively proportional distance apart from each other. Whilst the Angel lashes technique can be used to create a range of lash extension styles ranging from Dolly lashes to Cat Eye lashes to suit a wide range of clients, we would still suggest that you avoid using this style of lashes for clients with wide-set eyes as these wispy eyelash extensions can give the appearance that their eyes are even further apart.
How to Create an Angel Lash Map
To create a gorgeous set of Angel lashes you’ll need to build them up by creating an uneven top layer of lashes. We know this may seem a bit unconventional and goes against all of your Lash Tech instincts to try to keep everything looking even, but you’ll need to trust us because the end results will be worth it! For this heavenly set of lashes, we recommend that you use lash extensions like our Mayfair or Chelsea lashes in lengths of 7 mm up to 10 mm, with eye-catching spikes for a textured wispy look. In order to create the texture required for the bottom and middle layers of lashes, we would suggest that you use 8 mm lashes for the bottom layer, 9 mm lashes for the middle layer, and for a wispy top layer, to use 10 mm lashes.
To create the lash spikes you need to complete this lash look, you should use lashes in a diameter of 0.05 - 0.07 to form wispy 2D lash fans. Apply some lash Primer to a microfibre eyelash brush and make sure you are dabbing away any excess. Brush through the tops of your lash extensions whilst they are still on the lash strip to keep the tips together and create the closed fans (spikes) we’re aiming for. One thing to keep in mind when you are applying the Primer to the tips of the eyelash extensions is if you over saturate the lash strip all the way to the base, it will have an impact on the drying time of your lash glue. This can throw your timings off during the treatment with the possibility of retention issues for the lash extensions.
Ultimately, an Angel lash map combines short, lightweight closed fans with longer spikes to create a soft, wispy top line. The exact lengths and curls should always be adapted to the client’s natural lashes, eye shape and desired finish.
Recommended Angel Lash Lengths by Layer
| Lash layer | Suggested length | Purpose |
|---|---|---|
| Bottom layer | Approximately 8 mm | Creates a soft foundation and helps maintain a lightweight finish |
| Middle layer | Approximately 9 mm | Adds gentle fullness and supports the textured effect |
| Top layer and spikes | Approximately 10 mm | Creates the longer, wispy spikes that define the Angel lash effect |
Important: These lengths are a general starting point. Always assess the length, thickness and condition of the client’s natural lashes before selecting suitable extensions.
Fan Size, Diameter and Spike Placement
| Element | Recommendation |
|---|---|
| Fan style | Use narrow, closed 2D fans to produce a light and defined texture |
| Diameter | Use lightweight 0.05–0.07 lashes, depending on the fan size and strength of the natural lash |
| Filling gaps | Small, slightly more open fans can be placed between spikes where additional coverage is needed |
| Spike placement | Distribute spikes across the top layer rather than placing them in one concentrated area |
| Top line | Keep the top line intentionally uneven to create the characteristic wispy Angel lash finish |
Which Curl Is Best for Angel Lashes?
The most suitable curl depends on the direction of the client’s natural lashes and the effect you want to create. C and CC curls can produce a soft, wearable lift, while a D curl may create a more dramatic result. Avoid choosing a curl solely because of the desired appearance; it must also form a secure attachment with the natural lash.
Angel Lash Mapping for Different Eye Shapes
| Eye shape | Suggested approach |
|---|---|
| Round eyes | Use a soft squirrel or gentle cat-eye map to create balance and visually elongate the eyes |
| Almond eyes | Most Angel lash maps will work well; adapt the longest sections to the client’s preferred effect |
| Narrow eyes | Use carefully positioned spikes to open and define the eyes without creating excessive heaviness |
| Wide-set eyes | Avoid excessive outer-corner length, which may make the eyes appear farther apart |
| Close-set eyes | A softly elongated outer section may help create greater visual balance |
How to Apply Angel Lash Extensions
- Assess the natural lashes: Examine their condition, direction, length and strength before selecting extensions.
- Choose the lash map: Adapt a Dolly, Squirrel or Cat Eye map to complement the client’s eye and face shape.
- Plan the layers: Use shorter lengths through the bottom layer and gradually introduce longer lengths through the middle and top layers.
- Create the spikes: Form narrow, closed lightweight fans and position them throughout the top layer to establish the wispy outline.
- Build the supporting texture: Apply shorter closed fans through the lower layers, adding slightly more open fans where coverage is needed.
- Check the top line: View the lashes from different angles and adjust the spacing so the spikes appear balanced but not overly uniform.
- Complete the final checks: Look for stickies, confirm that every extension is securely attached and make sure the finished set feels comfortable.

There you have it! Everything you need to know about Angel lashes - from what they are, who they’re for, and how to create your very own gorgeous set of lashes. If you fancy levelling up your Angel lashes further, why not try adding a pop of colour into your sets with some silver and light blue coloured eyelash extensions for an angelic accent?
Angel Lashes: Frequently Asked Questions
What are Angel lash extensions?
Angel lash extensions are lightweight, wispy lashes created using narrow closed fans and delicate spikes. They combine the definition associated with Classic lashes with the soft texture of a light Volume lash set.
What is the Angel lash effect?
The Angel lash effect is a soft, textured finish with an intentionally wispy top line. Longer spikes are placed among shorter supporting fans to create definition without making the lash set appear excessively full or heavy.
What is the difference between Angel lashes and Classic lashes?
Classic lashes normally involve applying one extension to each suitable natural lash, producing a clean and defined finish. Angel lashes use lightweight closed fans and longer spikes to create greater texture, softness and light volume.
What is the difference between Angel lashes and Wet Look lashes?
Both styles use narrow or closed fans, but Wet Look lashes generally create a darker, more defined and uniform finish. Angel lashes have a softer appearance with more variation in length and more prominent wispy spikes.
How long do Angel lashes last?
Angel lashes generally follow the same natural shedding cycle as other professionally applied eyelash extensions. Most clients will require an infill approximately every two to three weeks, although retention varies according to natural lash growth, application, aftercare and lifestyle.
What curl is best for Angel lashes?
C and CC curls can create a soft, wearable Angel lash effect, while D curls can provide a more dramatic lift. The Lash Technician should select a curl that complements the client’s eye shape and forms a safe, secure attachment with the natural lashes.
Are Angel lashes suitable for sparse natural lashes?
Angel lashes can be adapted for clients with sparse natural lashes by using lightweight fans to create coverage between the spikes. The fan size, diameter and length must be selected according to the condition and strength of each client’s natural lashes.
How do you map Angel lashes?
To map Angel lashes, use shorter extensions through the bottom layer, medium lengths through the middle layer and longer closed fans as spikes through the top layer. Space the spikes across the lash line and adjust the overall shape to complement the client’s eyes, natural lashes and preferred finish.
Check out these featured products